
The Harvest Quilt-Along video tutorials are now finished, leaving you with one giant blog post of those tutorials, lucky!
If you're wondering what I mean by "Harvest Quilt-Along," let me explain: starting in July, my Facebook group, Collage Quilter Academy, began a "quilt as you go" style collage quilt using my Harvest downloadable patterns. We have just wrapped up the last tutorial, just in time for a live Q&A on September 24th that will be held in our Facebook Group, hope you can join us!
If you are not already apart of our Facebook group, I invite you to join us for future quilt-alongs! Click HERE to join.
Now, onto the tutorials!
To get started on any collage quilt, it is important to understand the values of that quilt and how it will affect your fabric selection. In this video, I will explain fabric selection as well as supplies needed to complete the Harvest veggies!
Next up, I went over technique and color theory.
I then moved onto sharing some of my tips and tricks for creating a successful collage quilt
Then finally, I went over quilting and finishing up. It is important to note that the blocks in this quilt-along were "quilt as you go" and my quilt sandwich formula is batting 1" larger than the finished quilt block, while the backing is 2" larger than the finished quilt block. To finish, sew blocks together with backing sides together so seams are on front (1/2" seam allowance). Then apply sashing to front of quilt over the seams.
Here's what I ended up doing with my veggies:

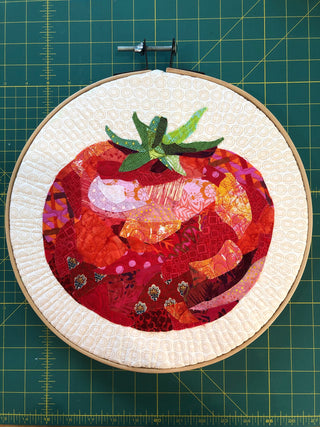
I turned my tomato into an embroidery hoop wall hanging...
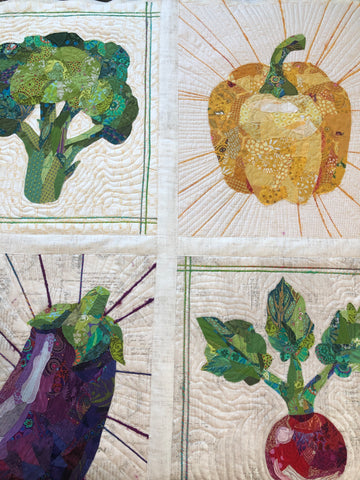

...my broccoli, pepper, eggplant, and radish into a larger wall hanging...

And finally, my pumpkin into a Jack-O-Lantern pillow. To learn how to turn a collage into a pillow case, click HERE.
Remember to tune in on September 24th for a live Q&A in the Collage Quilter Academy group! Thank you for participating, I hope you enjoyed creating the Harvest quilt as much as I did! I would love to see what you created in the Facebook group!