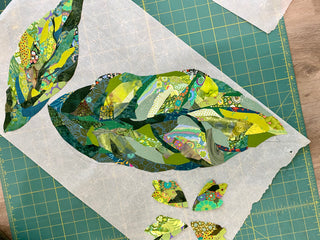
As a designer / artist who is always trying to improve, there are times when my brain is on full-throttle creative mode and I seem to tap into a source of inspiration beyond my own capacity. I know that sounds weird. But, what I mean is that when I push myself to innovate, I'm rewarded with with that "stroke of genius" moment. I experienced that recently as I was trying to create a new type of collage quilt. The result is my new "Parchment Pressing" technique.
Before I describe the technique, let me explain why it's a great innovation in making a collage quilt:
1) Complete Creative Control. Using this technique provides YOU with the ability to decide how large or small your collage quilt is, as well as the composition of the project.
2) Intricate Designs Become Simple. With this method, designs that would have been difficult to cut and apply to a different foundation fabric become easy. This means that you can audition your collaged elements on different backgrounds. Now, you can choose to put your collage together on a white background, a pieced background or a beautiful piece of fabric like I did with "May Day". More creative options = more fun :)
3) NO TRACING involved. Yes, it's true! No tracing, no transferring, no piecing templates together. The use of transparent parchment paper over the design elements eliminates tedious tracing found in other patterns.
The "Parchment Pressing" Technique in 3 Steps
no. 1 Cover the design element you want to create with parchment paper. (My new pattern, "May Day" provides these 10 elements to use in creating your project)

no. 2 Following the gradient in each element, apply fabric pieces to the parchment paper. (Fabric pieces must be prepared with Lite Steam a Seam 2)
no. 3 When you are satisfied with the collage of the element you are working on, press it with a DRY iron to the parchment paper.
Composition of the Collage Quilt
Create as many elements as you'd like to use for your collage. Leave each element on parchment paper until you are ready to create the composition.

Top tips to remember for creating a pleasing composition
1) Use odd numbers. If you look at my finished quilt, you'll see 3 pink flowers, 5 white flowers, 5 large flowers, 3 flower colors, 3 large green leaves. (Yes, I know, there are 2 purple flowers... but that's alright because 3 peonies + 2 anemones = 5 large flowers... the odd number).
2) Keep things close together for a fuller, more interesting look.
3) Audition different arrangements. The great thing about the Lite Steam a Seam 2 on the back of the elements is that it retains its temporary stickiness so that you can reposition things!
4) Create contrast for a dramatic statement: contrast in color, contrast in shape and contrast in size. Here's where you see contrast in my quilt: green and pink are complementary colors and create HIGH contrast; Contrast in the size of the different types of flowers; There is also HIGH contrast in the shape of the leaves vs. the shape of the flowers.


